Jeanine assisted me today as we installed 36 smart light switches throughout the River House. Each switch is a programmable dimmer with an occupancy sensor that can be accessed over the Wi-Fi network for home automation functions. She prepped them while I installed them which made the job go twice as fast as it would have had I been doing the work alone. Towards the end, the skin on my fingers was starting to blister from tightening so many twist-on wire nuts (4 per switch) and she took over that job as well. Next, I taught her how to apply the hard wax oil we will be using on all the cabinetry and she finished one of the panels that will surround our freezer. We wrapped up the day by making a catalog containing the QR code for each light switch to facilitate future programming once we have Wi-Fi enabled. It is really the first time we have worked on the new house together and I really enjoyed working with her.
Jeanine returned today from a week-long visit with her sister Susan who lives in Burlington, Vermont. They had all kinds of fun including a visit to the Happy Bird Poultry Farm. I have been so busy working on the River House that time has passed quickly. Even so, I missed her and am glad she is back. I guess that would make me the happy bird.
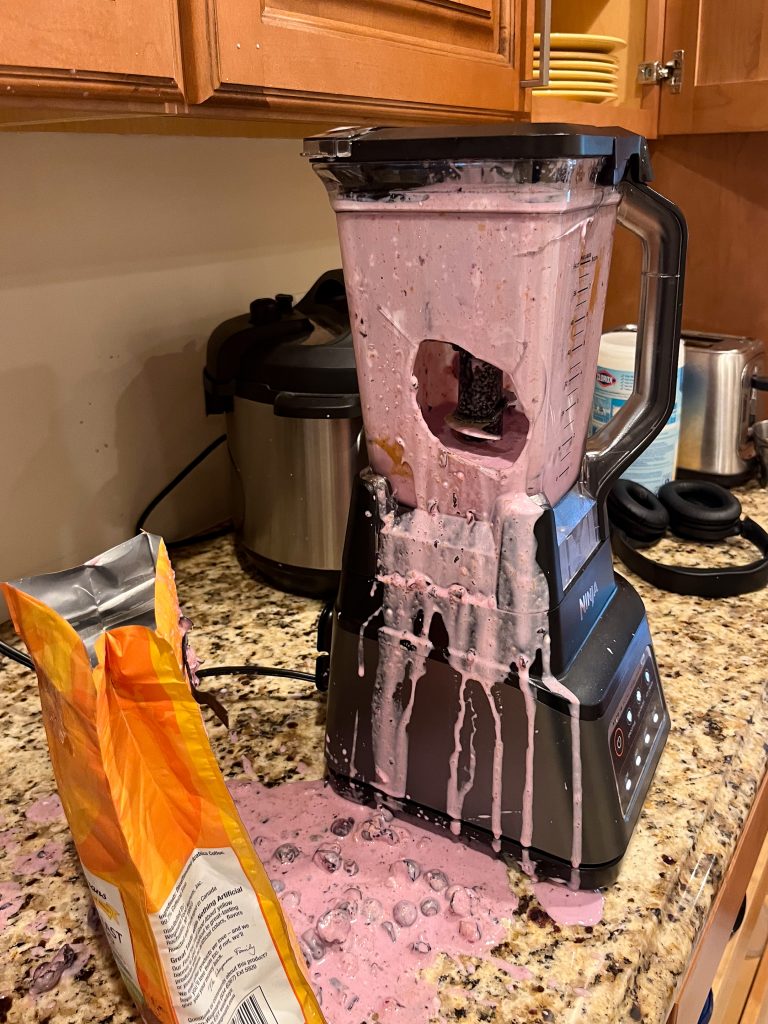
Kyle shared this photo of his blender which was not up to the task of making his morning smoothie. Fortunately, the company has offered to replace it for free.
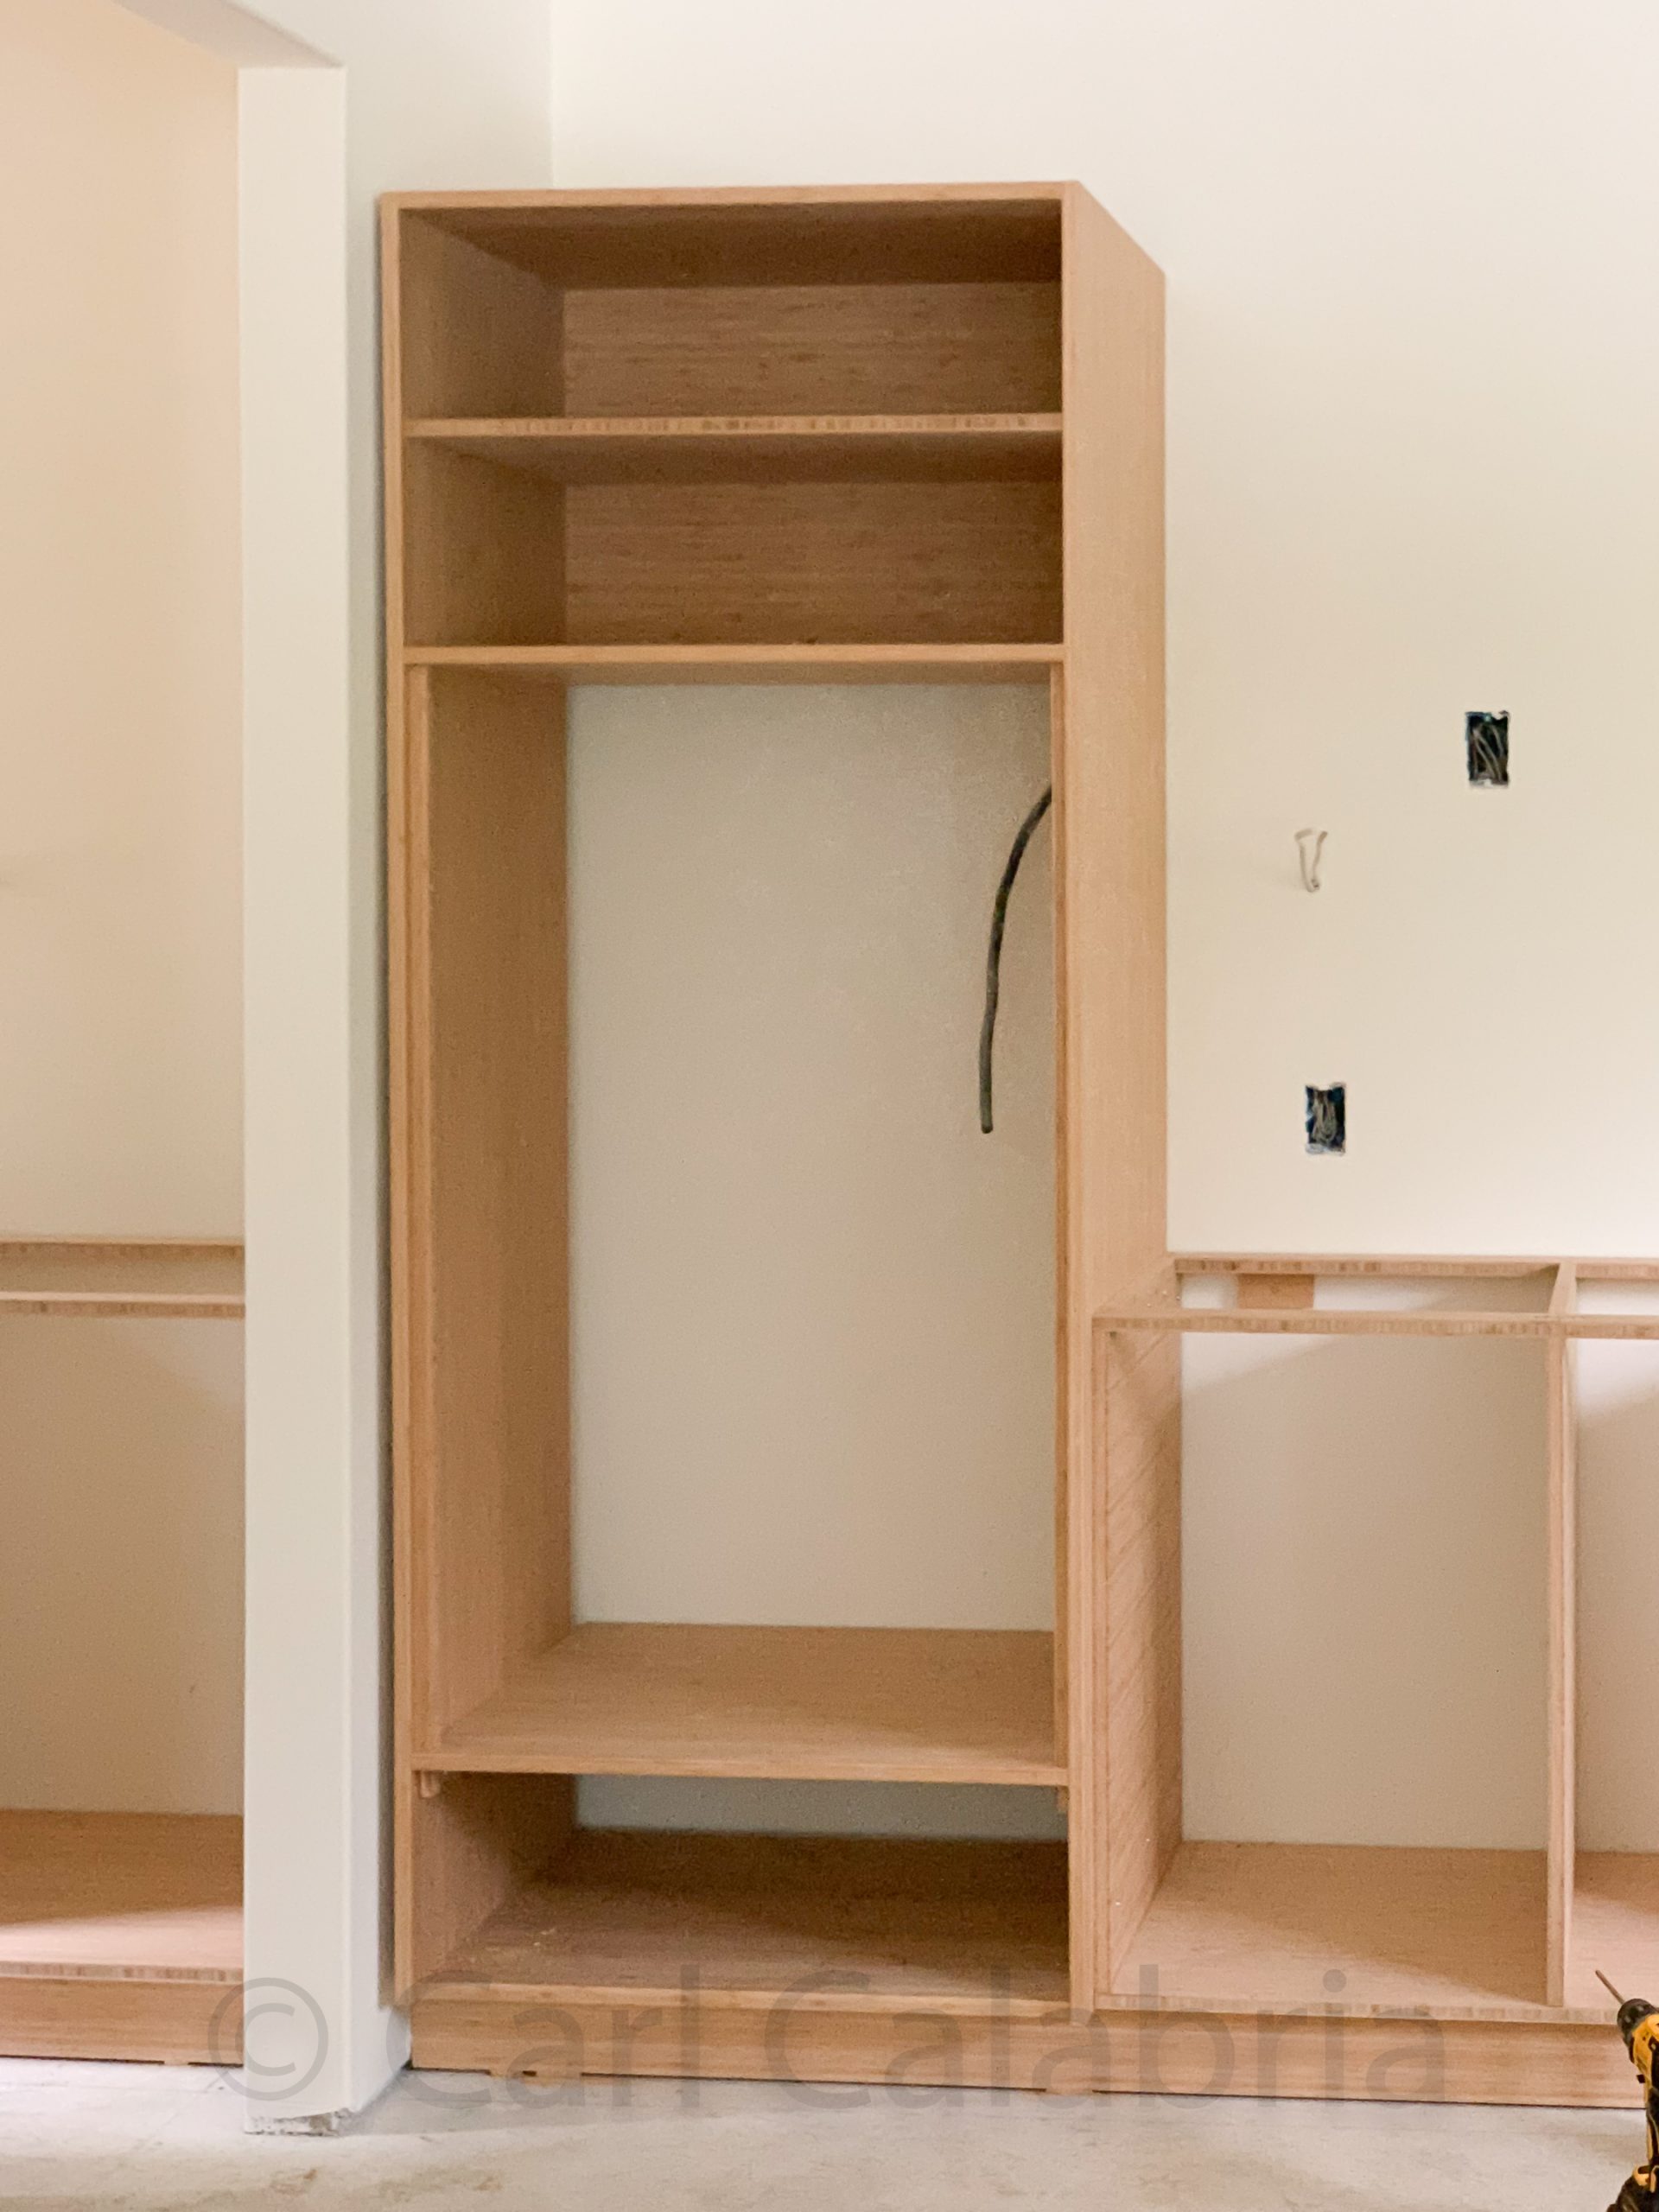
I completed the tall kitchen cabinet carcass for the double oven today. So far it has been the most time-consuming to build. All but one of the front faces required veneering, the “shelf” which supports the ovens had to be designed to support a 350-pound load, and the cavity had to be dead plumb, level, and square. It is also the heaviest single item I have built so far which made it difficult to move and install. There will be a drawer below the ovens and a cabinet with two doors above it. Still needed is a filler strip on the left to close the gap to the wall which is one of the few in the entire house that is not perfectly plumb; argh. Even though it fought me almost every step of the way, I am extremely happy with the finished product.
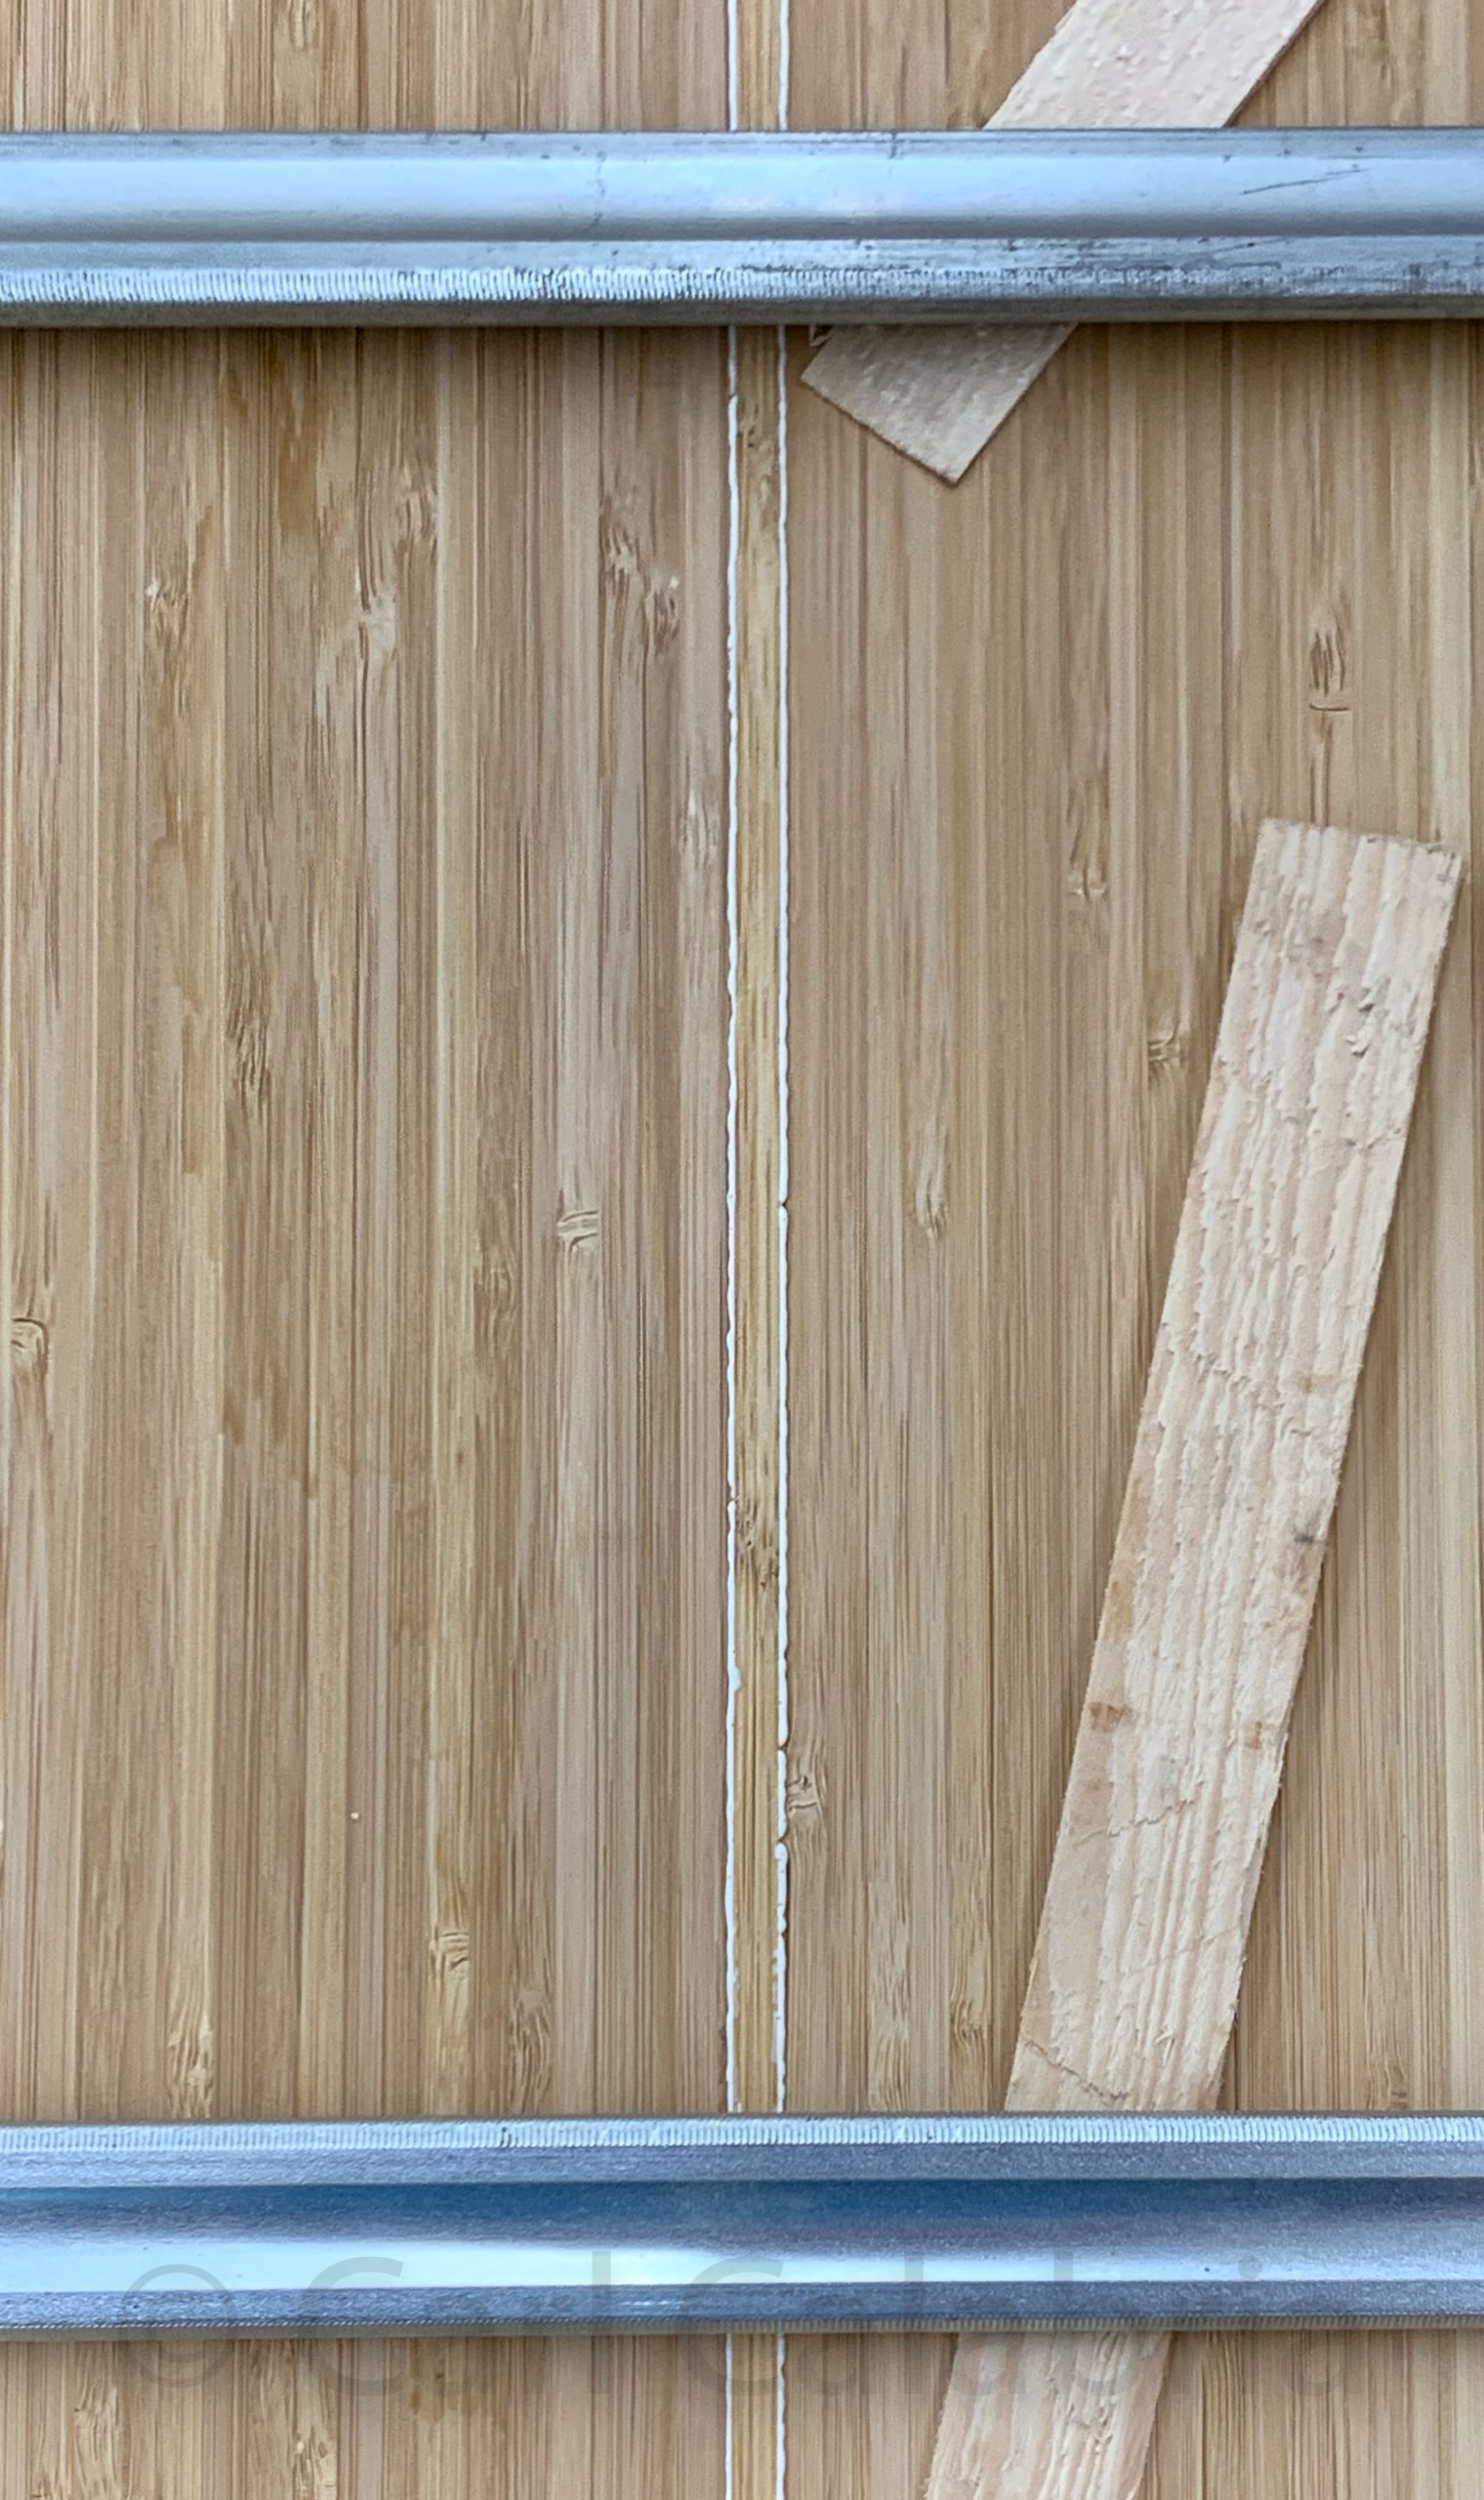
It is said that woodworkers basically take big pieces of wood, cut them into smaller pieces, and then glue them back together. Therefore, if you want to make fine things out of wood you need to master the art of gluing. Apply too little and your joint will fail. Apply too much and you will have a time-consuming gooey mess to clean up. After 40 years of practice, I am prepared to say that the glue lines pictured above are as close to perfection as you can get. You are actually looking at two plywood panels, each with a 1/8″ veneer glued to the edge. The veneers are placed back to back and the pair of panels are clamped together as cauls for each other. If you apply exactly the right amount of glue, distribute it evenly, and apply uniform clamping pressure you will be rewarded with the tiniest bead of squeeze-out confirming full coverage. The shims placed under the bar clamps keep them out of the glue preventing rusting of the clamps and staining of the wood.
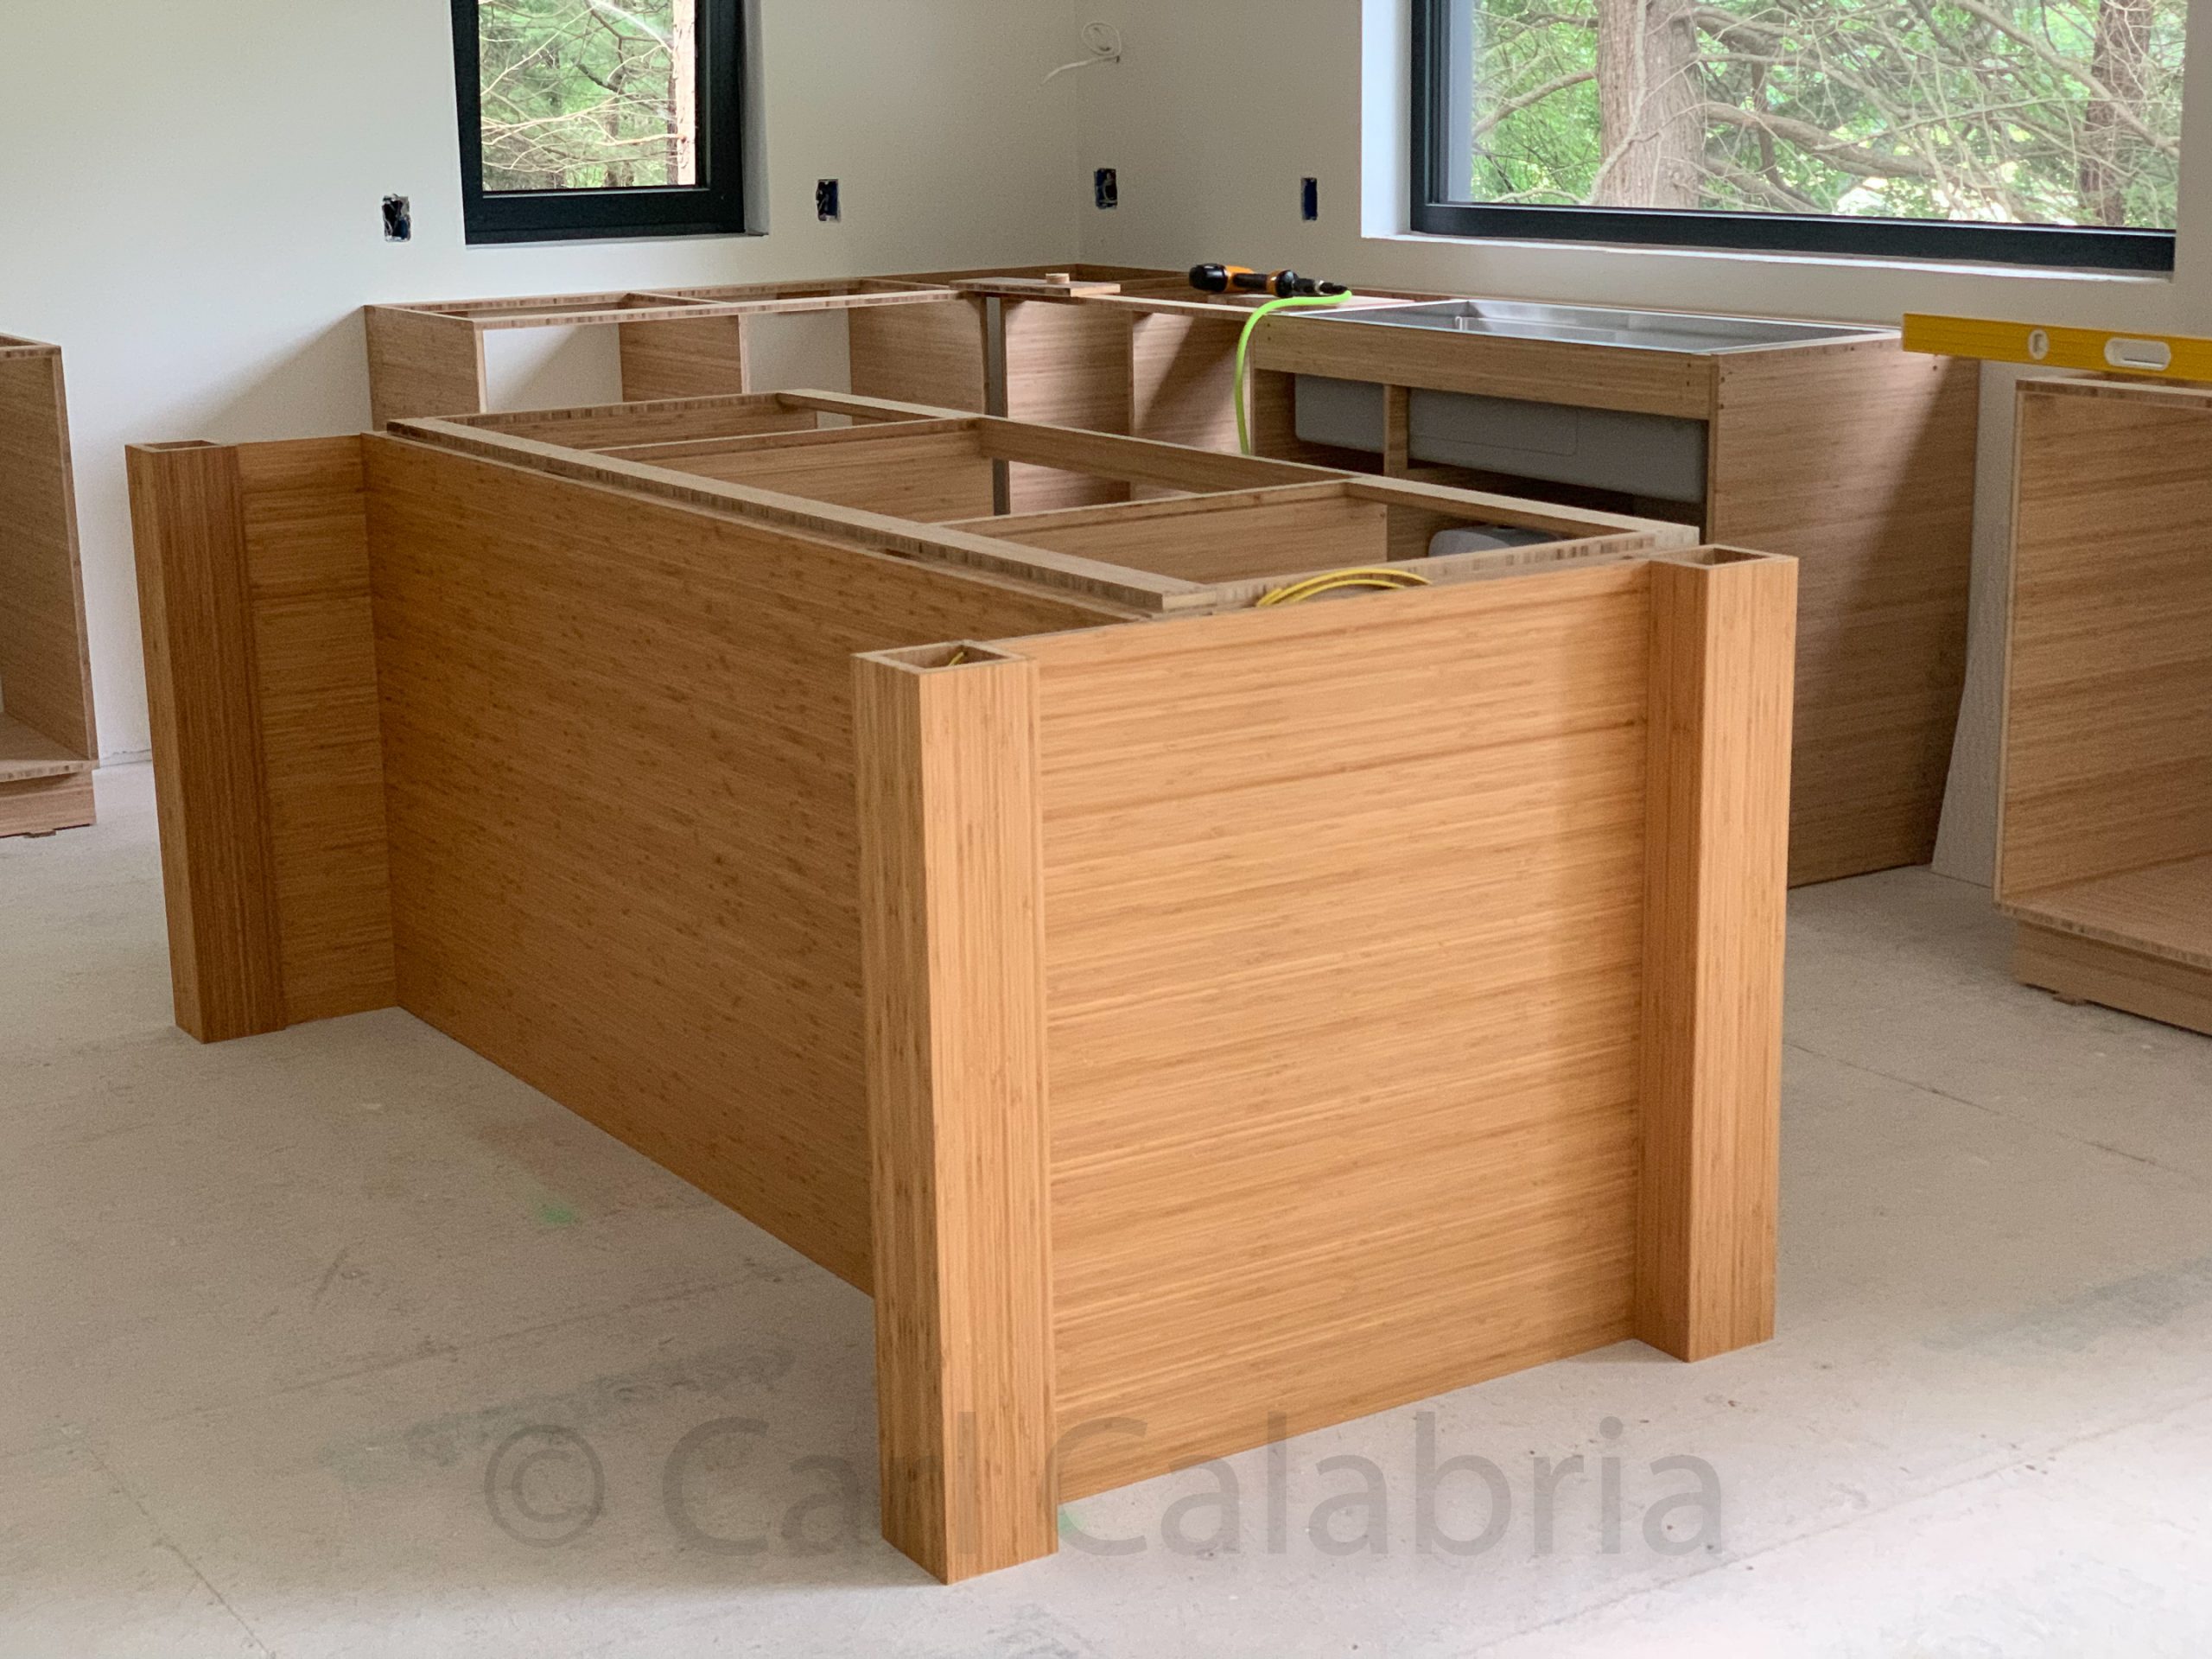
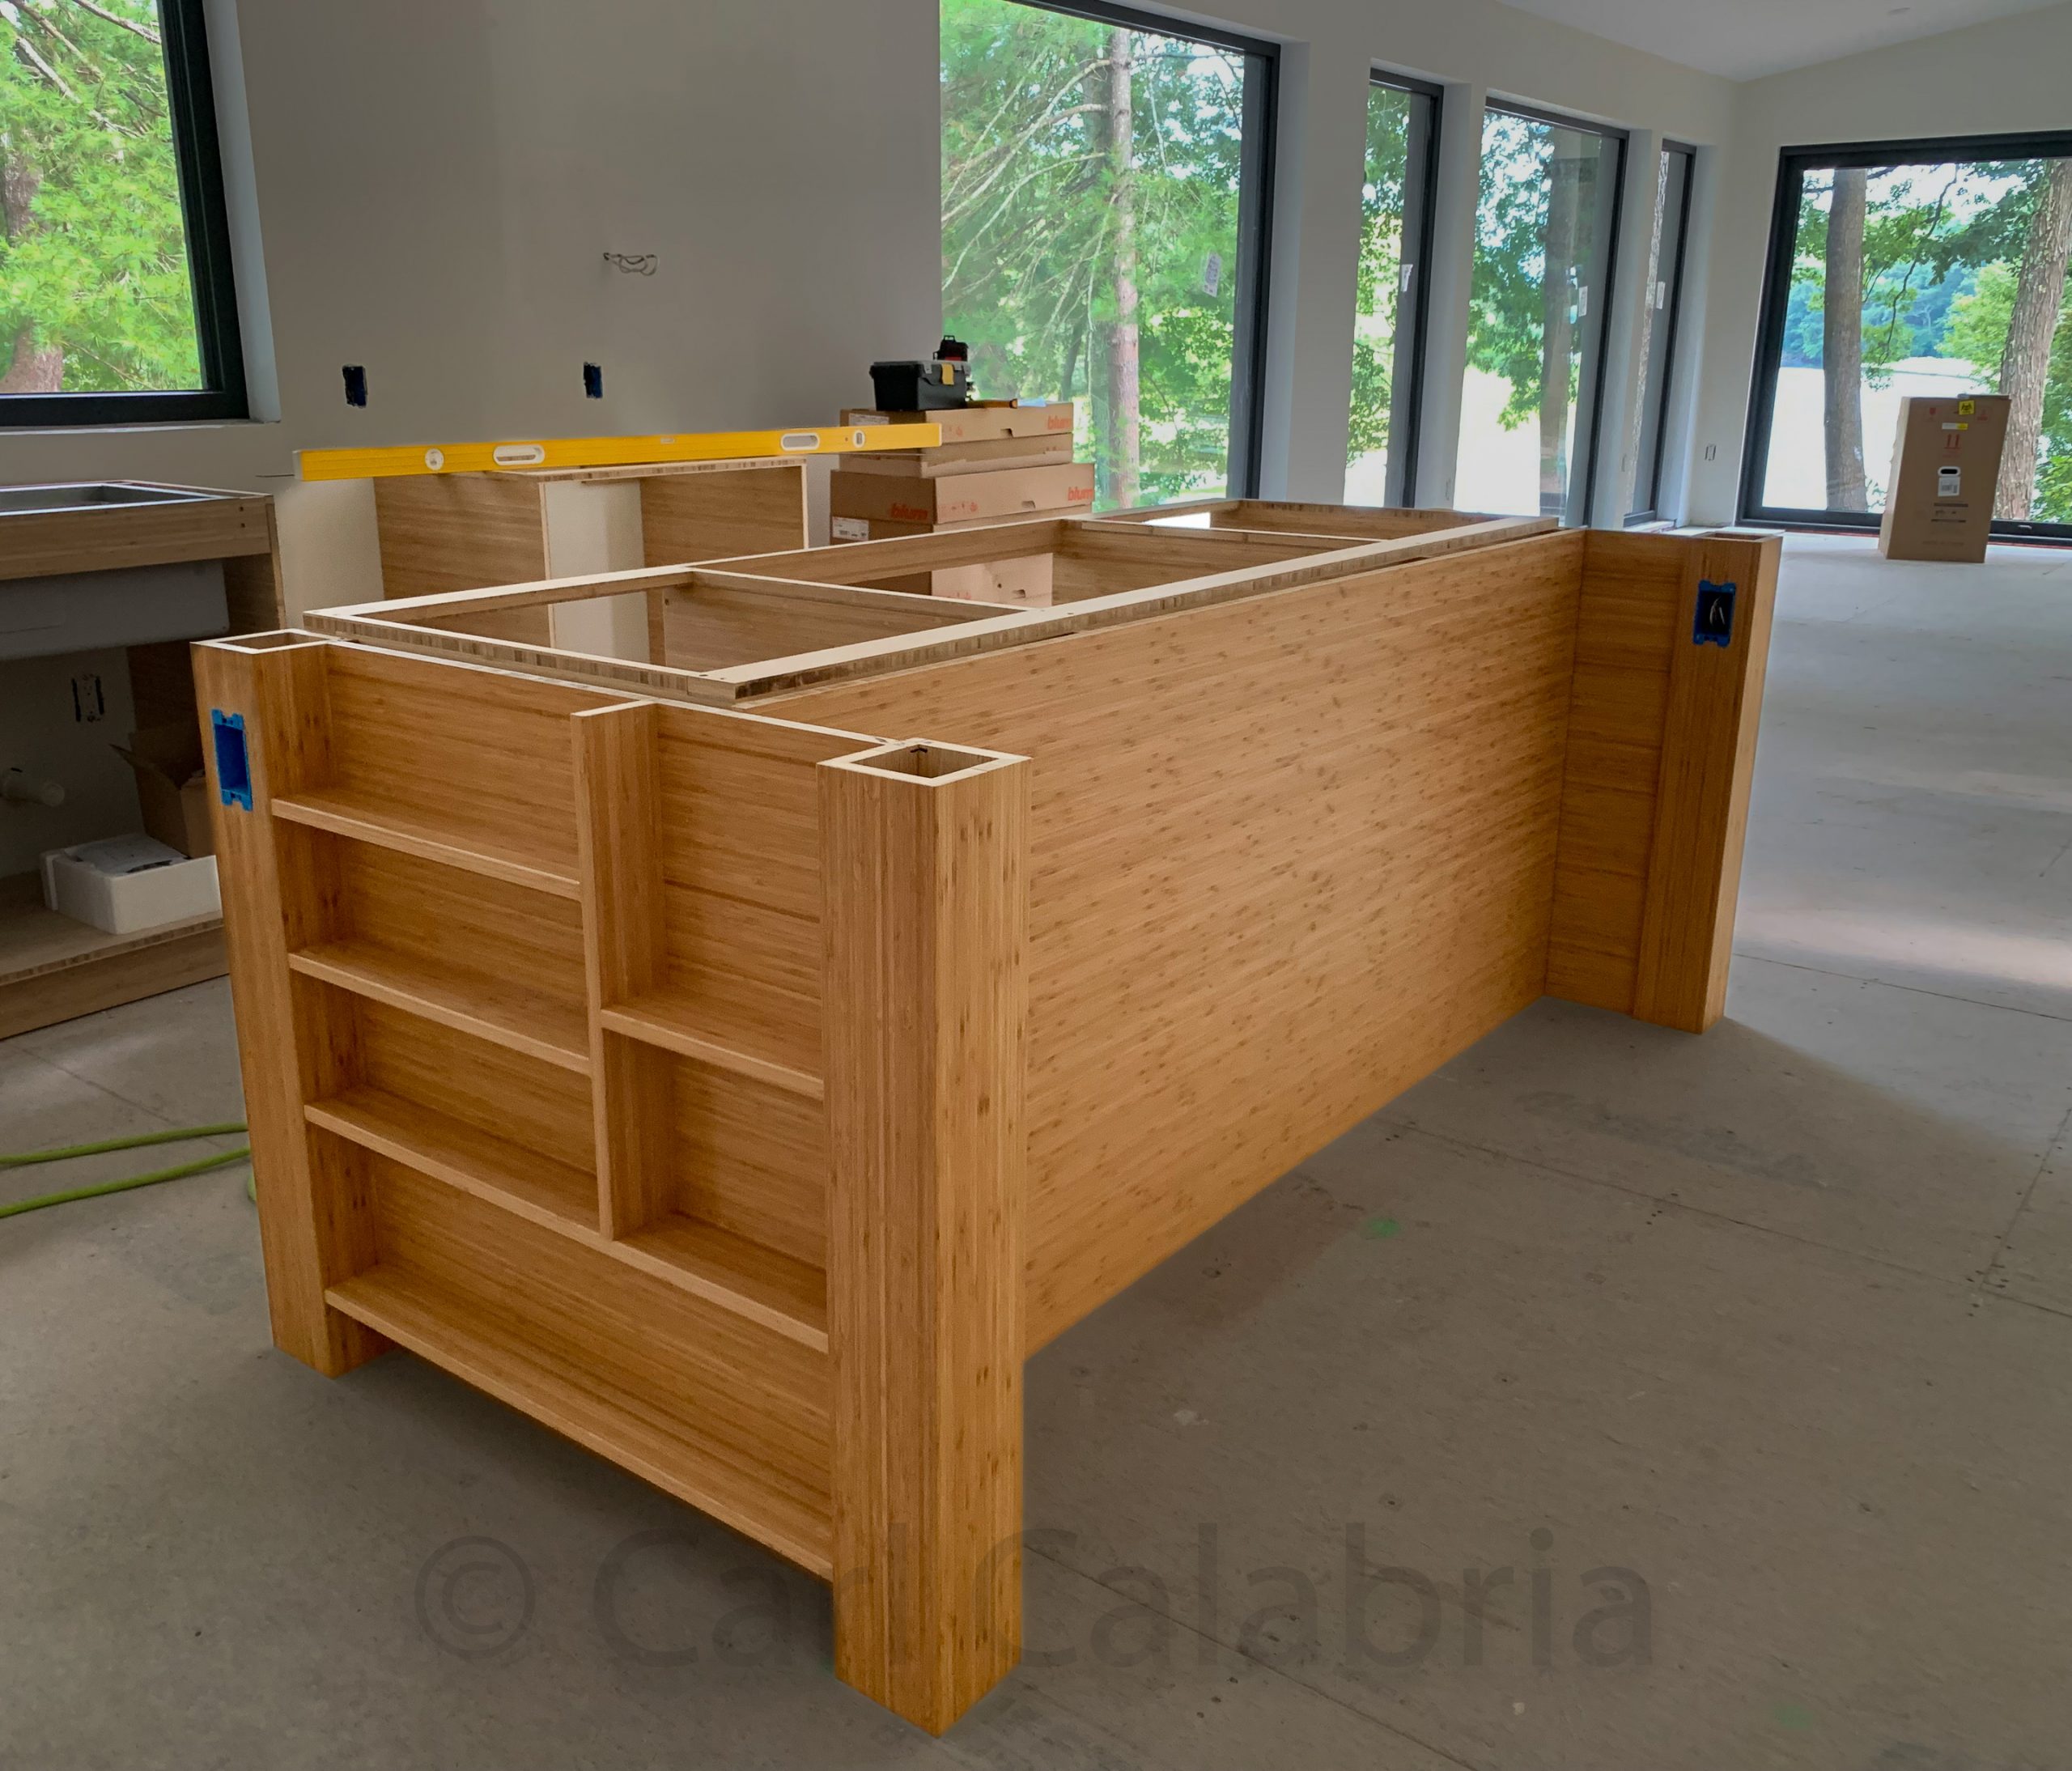
I completed the base for the kitchen island today. When the countertop is added it will create a seating area on one side and have the induction cooktop placed on the other. Unlike the other cabinets in the kitchen, the island will sit on top of the finished floor. Therefore, I have not yet fastened the end caps or the back panel to the drawer carcass to keep the weight manageable; it would be very difficult to move fully assembled. The end cap on the kitchen-facing side includes open shelving for frequently used spices and cooking oils. Should we be so lucky to entertain toddlers at some point, I am sure this will be a favorite point of interest and I already have some child-proofing ideas in mind.
We deliberately pulled our electrical permit in the final week of 2022 so that we would not be subject to new 2023 code requirements that do not allow for kitchen island-mounted outlets. The new regulations only allow for outlets mounted on island countertops which is the last place I would pick to put an outlet, pop-up, or otherwise. The outlet within the seating area will include 2 USB-C charging ports and will not be visible from the dining and living areas. The other outlet will be for cooking-related appliances that are temporarily used on the island.
With these choices, we have a single island with two personalities. Viewed from the dining/living space, it presents clean lines and no clutter. while the kitchen end is all about the business of cooking.
If sawdust production is any measure of my cabinet making progress, I am 30 gallons in, closer to 50 if you include the contents of my dust collection system bin. Most of this was generated from my router table while machining lock miter joints. It is the only major piece of equipment I have that is not yet connected to my dust collector. I plan to rectify this before doing any further routing and hope to have the necessary parts within the week.
The kids joined us at the Road House for dinner to celebrate Kyle’s 31st birthday. Jeanine cooked up a feast including a peach-tomato-basil salad, fresh corn risotto, and beef tips. Maya was here for most of the day doing upkeep on her tiny house which she was proud to show off after dinner. I spent most of the day at the River House continuing with cabinetry work. Busy schedules have prevented us from gathering as a family for several weeks and it was nice to catch up with everyone. Kyle has been promised a promotion to manager within the year at his job and is now renting out his basement to a couple and their two puppies. He is planning to take a week-long vacation in Montana after attending a wedding there. Nico is in training for his upcoming climb of the 19,000 ft Cayambe Volcano in Ecuador and for the Amp Futbol Cup in Warsaw, Poland as a member of the US National Team. Maya will be climbing in Vermont next weekend and is planning a trip to Olympic National Park later this month. The shoulder injury she sustained mountain biking will require arthroscopic surgery and she is looking into the best options for having that procedure.
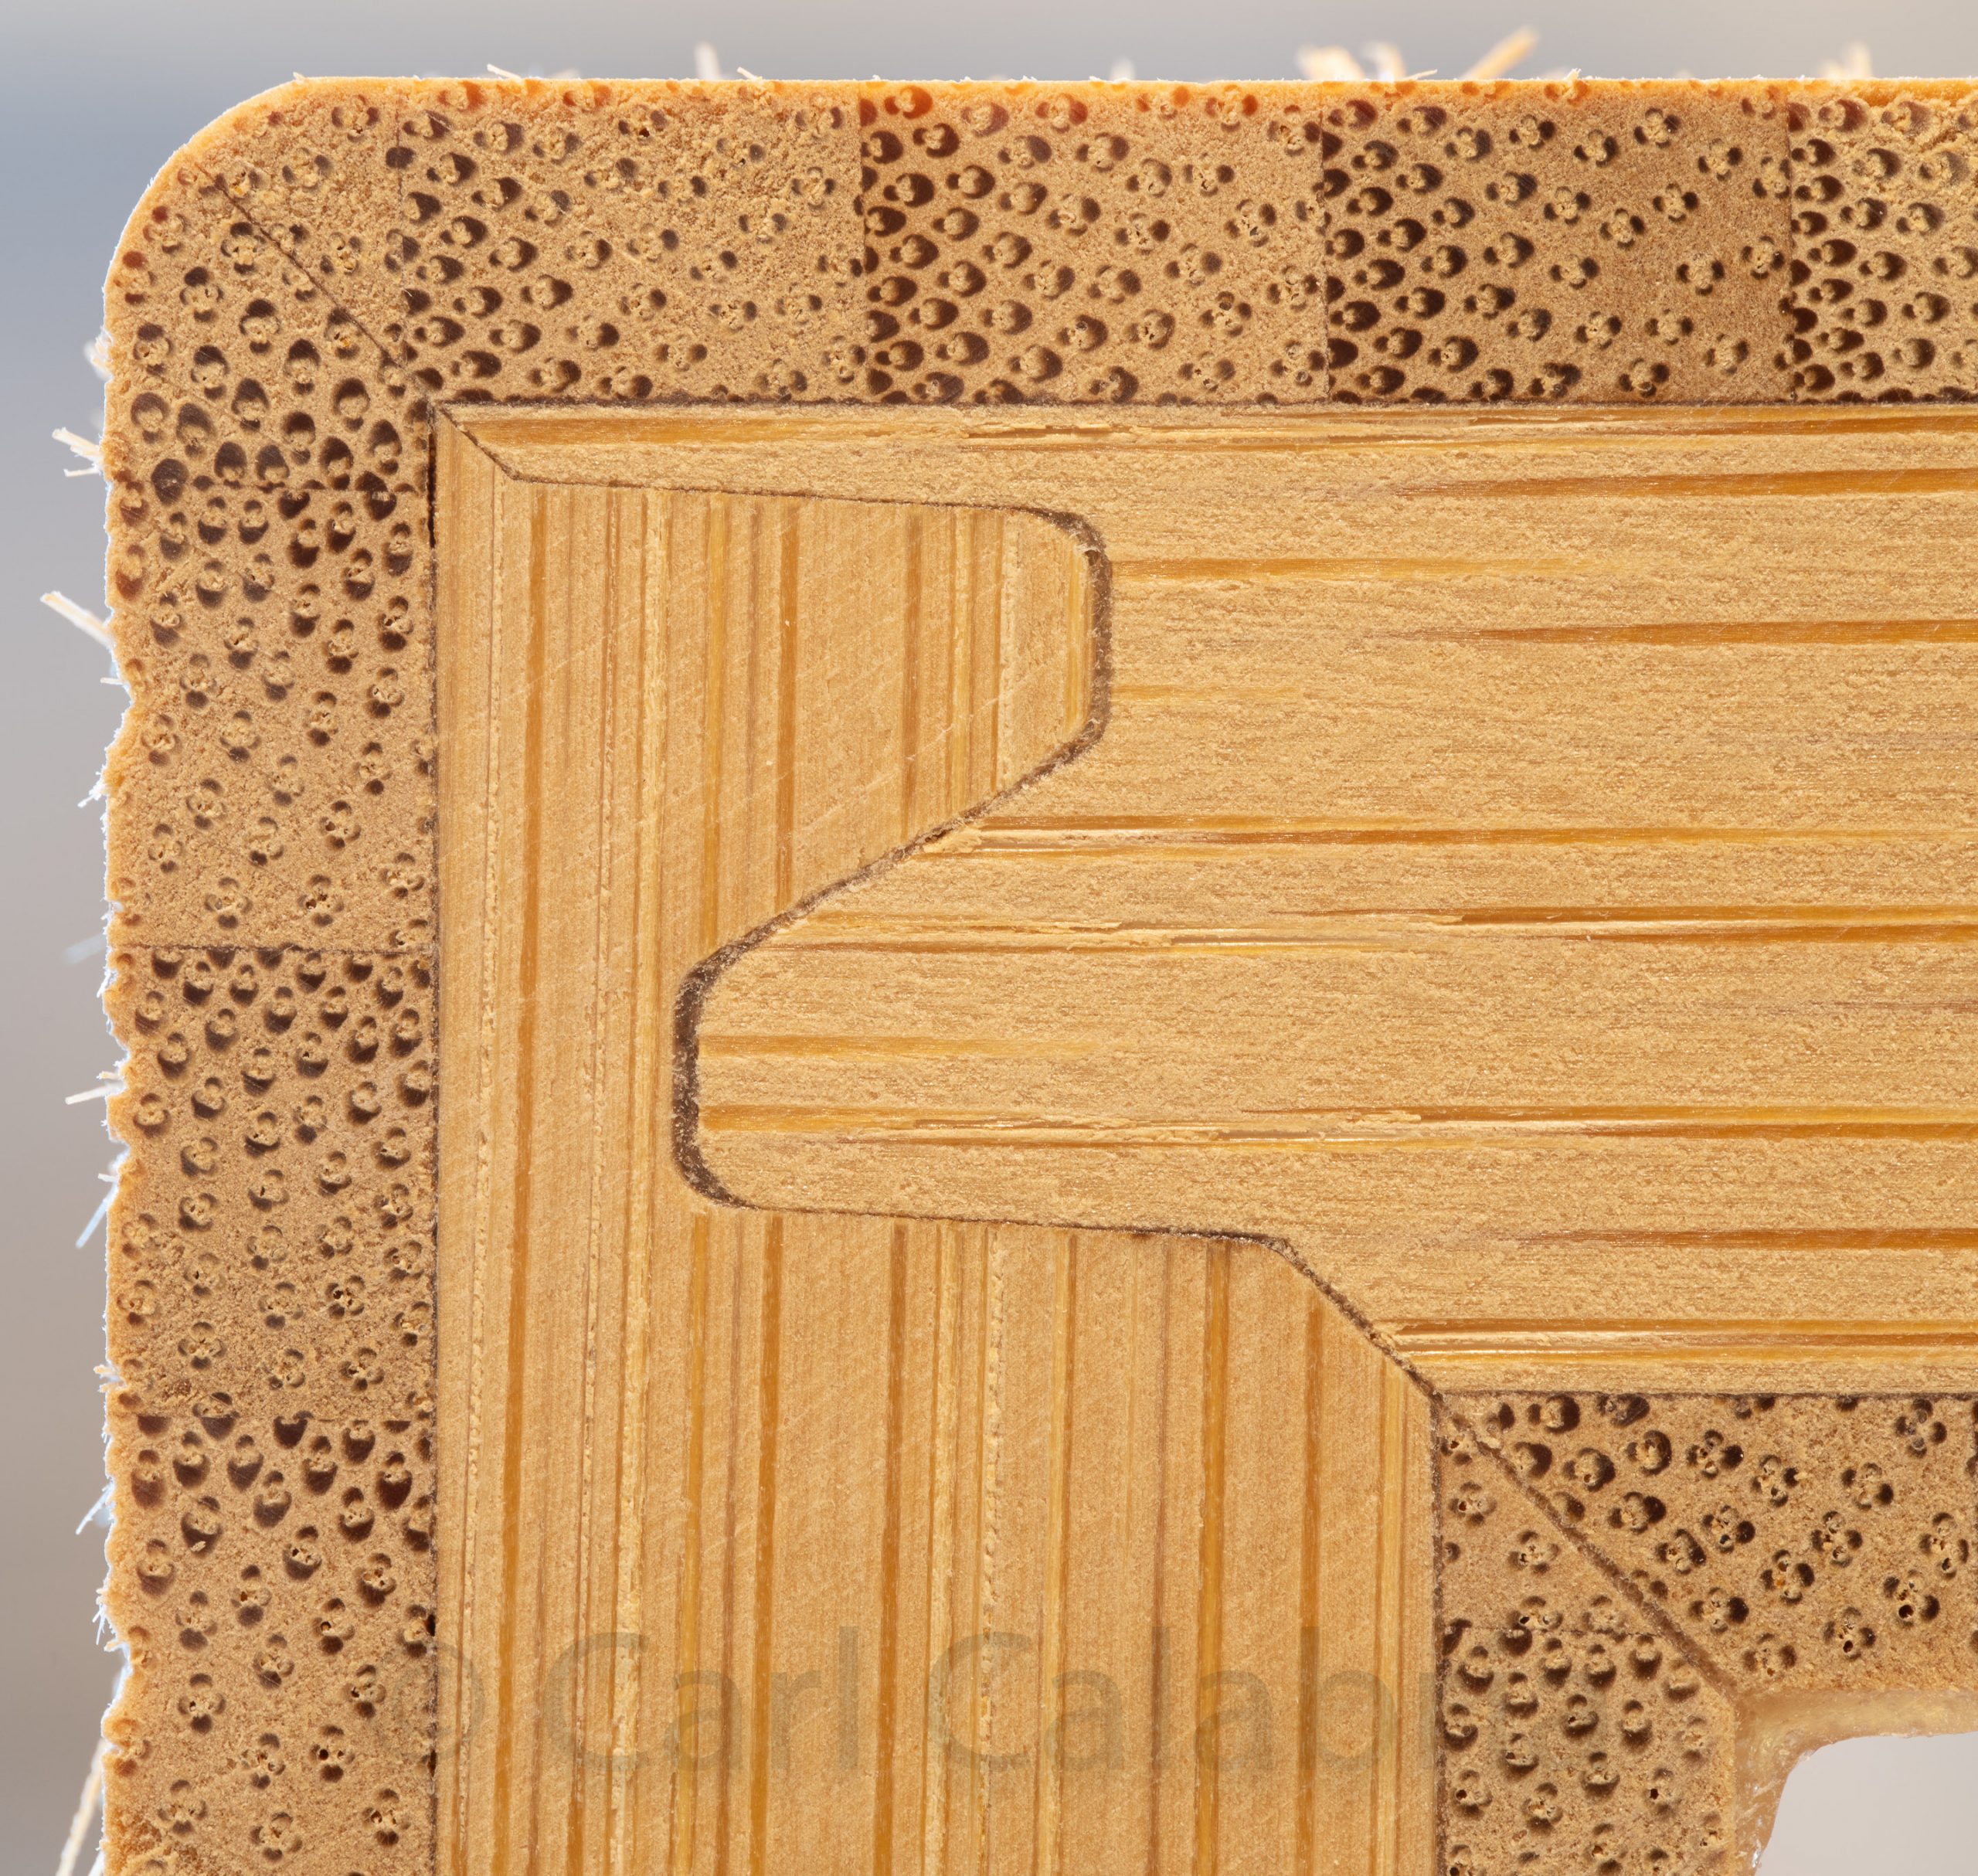
The kitchen island in the River House will be supported by four 5″x5″ columns. I am making them out of 3/4″ thick bamboo plywood using a lock miter joint at each corner. Pictured above is a cross-section of the joint taken from a thin slice I trimmed to square up the end. It looks rather complicated but can be made with a specialized router bit. Setup is a little tricky but once bit height and fence depth are properly adjusted things move along with little additional fuss. The only negative side to working with bamboo is that it dulls cutting tools very quickly. By the time I machined the 16 panels I needed, my once very sharp miter bit was groaning at the prospect of more bamboo. I must say, I am very pleased with the way the columns turned out and am now planning on using this joint for the construction of the stair treads and possibly for all drawer boxes as well.
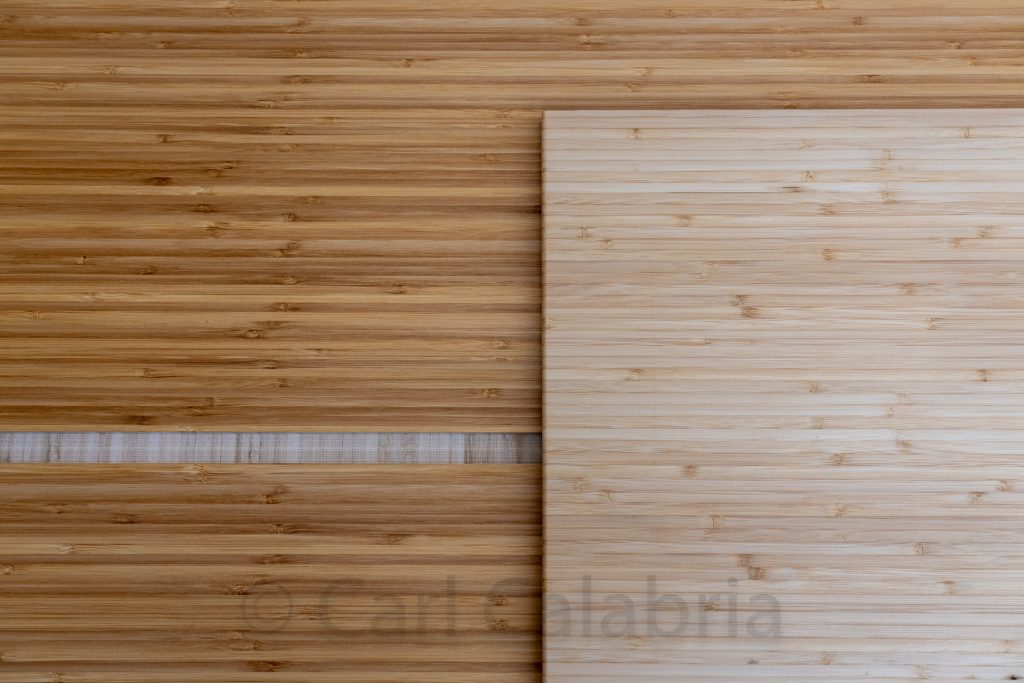
The bamboo plywood I am using to construct all of the cabinets and built-ins for the new house has been a pleasure to work with save for the fact that it wears out carbide-tipped tools very quickly. Not so pleasant have been all of the mistakes made by the supplier. (1) Selected a carrier that did not have the right equipment to provide the contracted delivery method. (2) The second “rescue” carrier had the right equipment but arrived on site with the wrong kind of truck on their first delivery attempt. (3) When it was finally delivered (several weeks late), every single one of the 36 sheets had some form of water damage. (4) We ordered the carbonized color (darker one above) and received several that are of the natural color). We even received some sheets that are carbonized on one side and natural on the other, which is not even a product that the company sells. The photo above is of two sides of the same board! Thus far the company seems prepared to make things right so I am just rolling with the punches for now. I have been cutting off and scrapping water damaged sections or using them in non-visible locations. The mixed color challenge will be the most time consuming to address as it will required staining the natural boards to match the carbonized.
Twenty years ago, I enjoyed watching a television series called Boston Legal. The show was about the fictional law firm Crane, Poole & Schmidt whose Boston office was located at 500 Boylston St. Today, I had a meeting there with the founder of a venture capital firm and made the connection as I approached the building.
I found this little fellow lifeless on a window sill in the River House. All of the operable windows there are in their venting position to allow the house to dry out. The plaster, paint, concrete, and many other construction materials have a great deal of latent moisture that needs to be shed. We cannot begin laying the floor until the indoor humidity has stabilized at a reasonable level. The vented windows let in a lot of insects but they do not seem to be able to find their way out again. Fortunately, we should have our AC up and running in the next week or two which will allow us to close all the windows. As I am typing this, I just realized that we have screens for all the windows and there is no reason not to install them now.
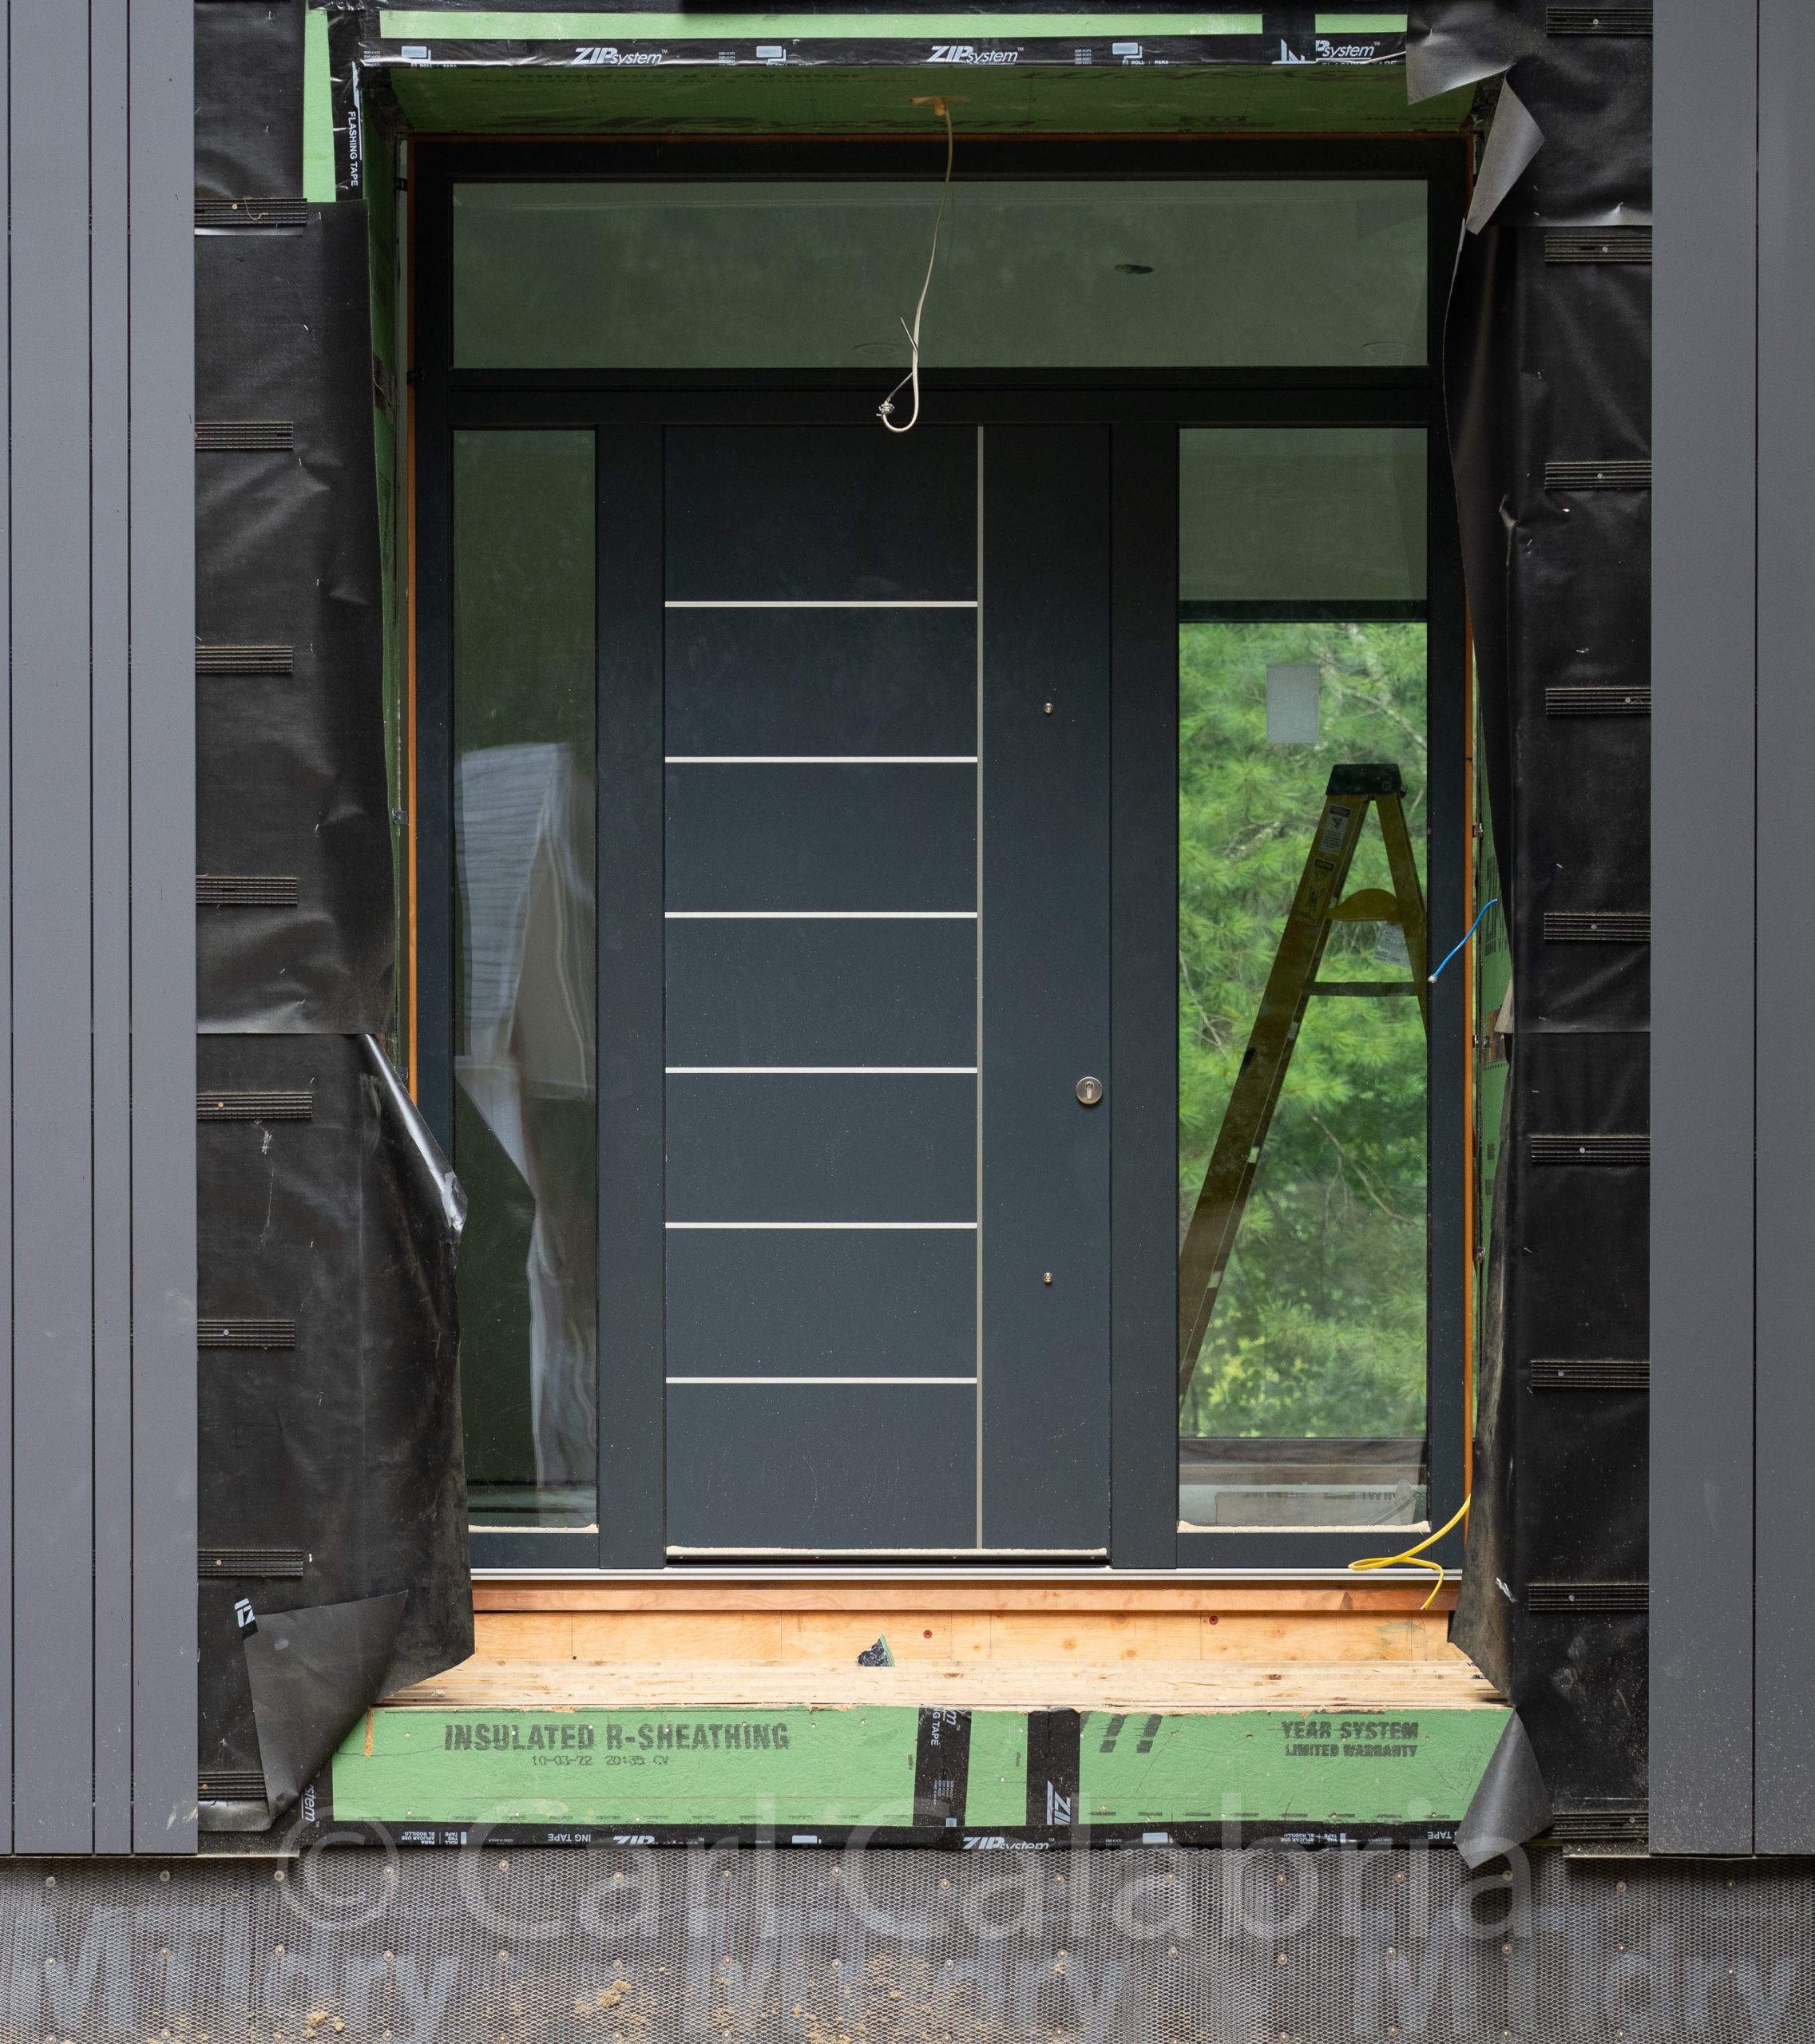
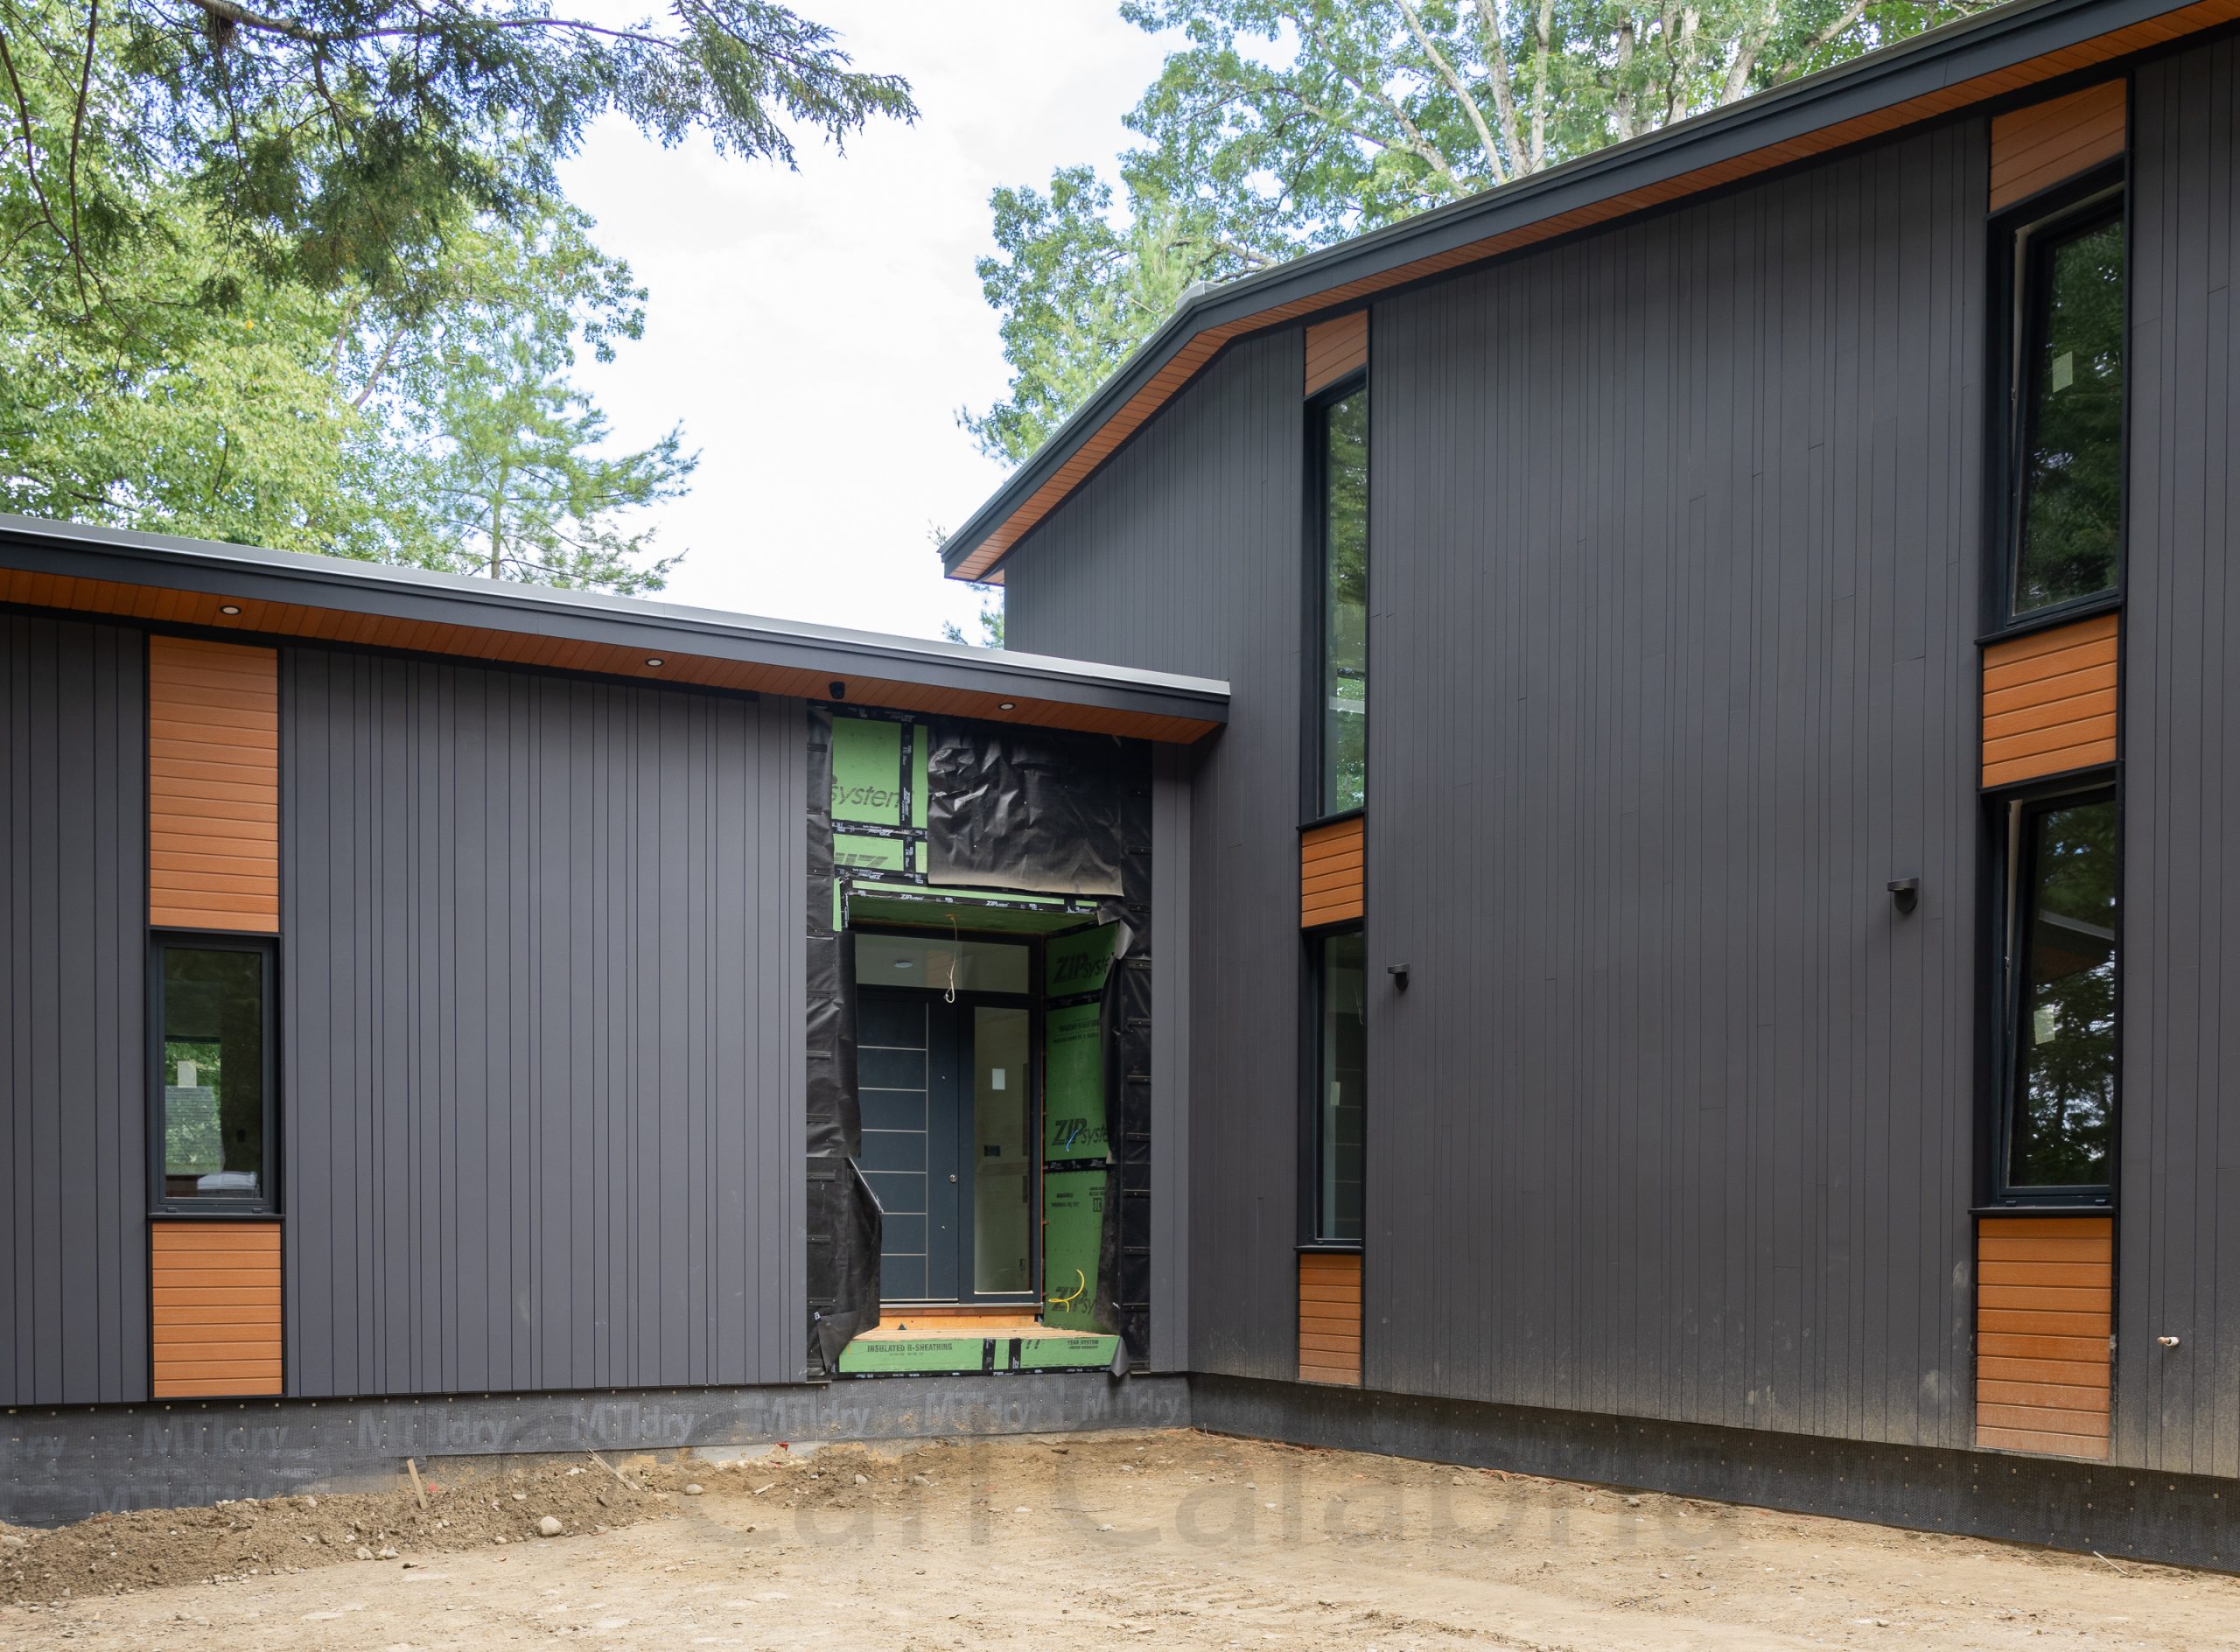
The front door assembly was the final missing element of our new home’s exterior. It was installed today but not without challenges. Due to the way it must be tipped into position because of its extreme weight the opening height has to be larger than the published rough opening. Mathematically speaking, the space needs to be sized to equal the hypotenuse of a triangle with a base equal to the width of the door assembly and a height equal to the height of the door assembly. When the foreman of the five-man installation crew found me in my shop to inform me that the door would not fit, I simply grabbed one of my battery-operated saws and followed him upstairs. I have learned to roll with the punches through the course of our build. In less than 20 minutes, I was able to increase the size of the rough opening and the door assembly was placed into postion. Even though it is fully functional as-is, the crew will return on Friday to remove and reinstall the assembly so that it can be anchored more securely and raised up higher so that the door will have more clearance above the finished interior floor (to accommodate a rug).
This website is dedicated to sharing, with family and friends, the day-to-day adventures of the Calabria family.